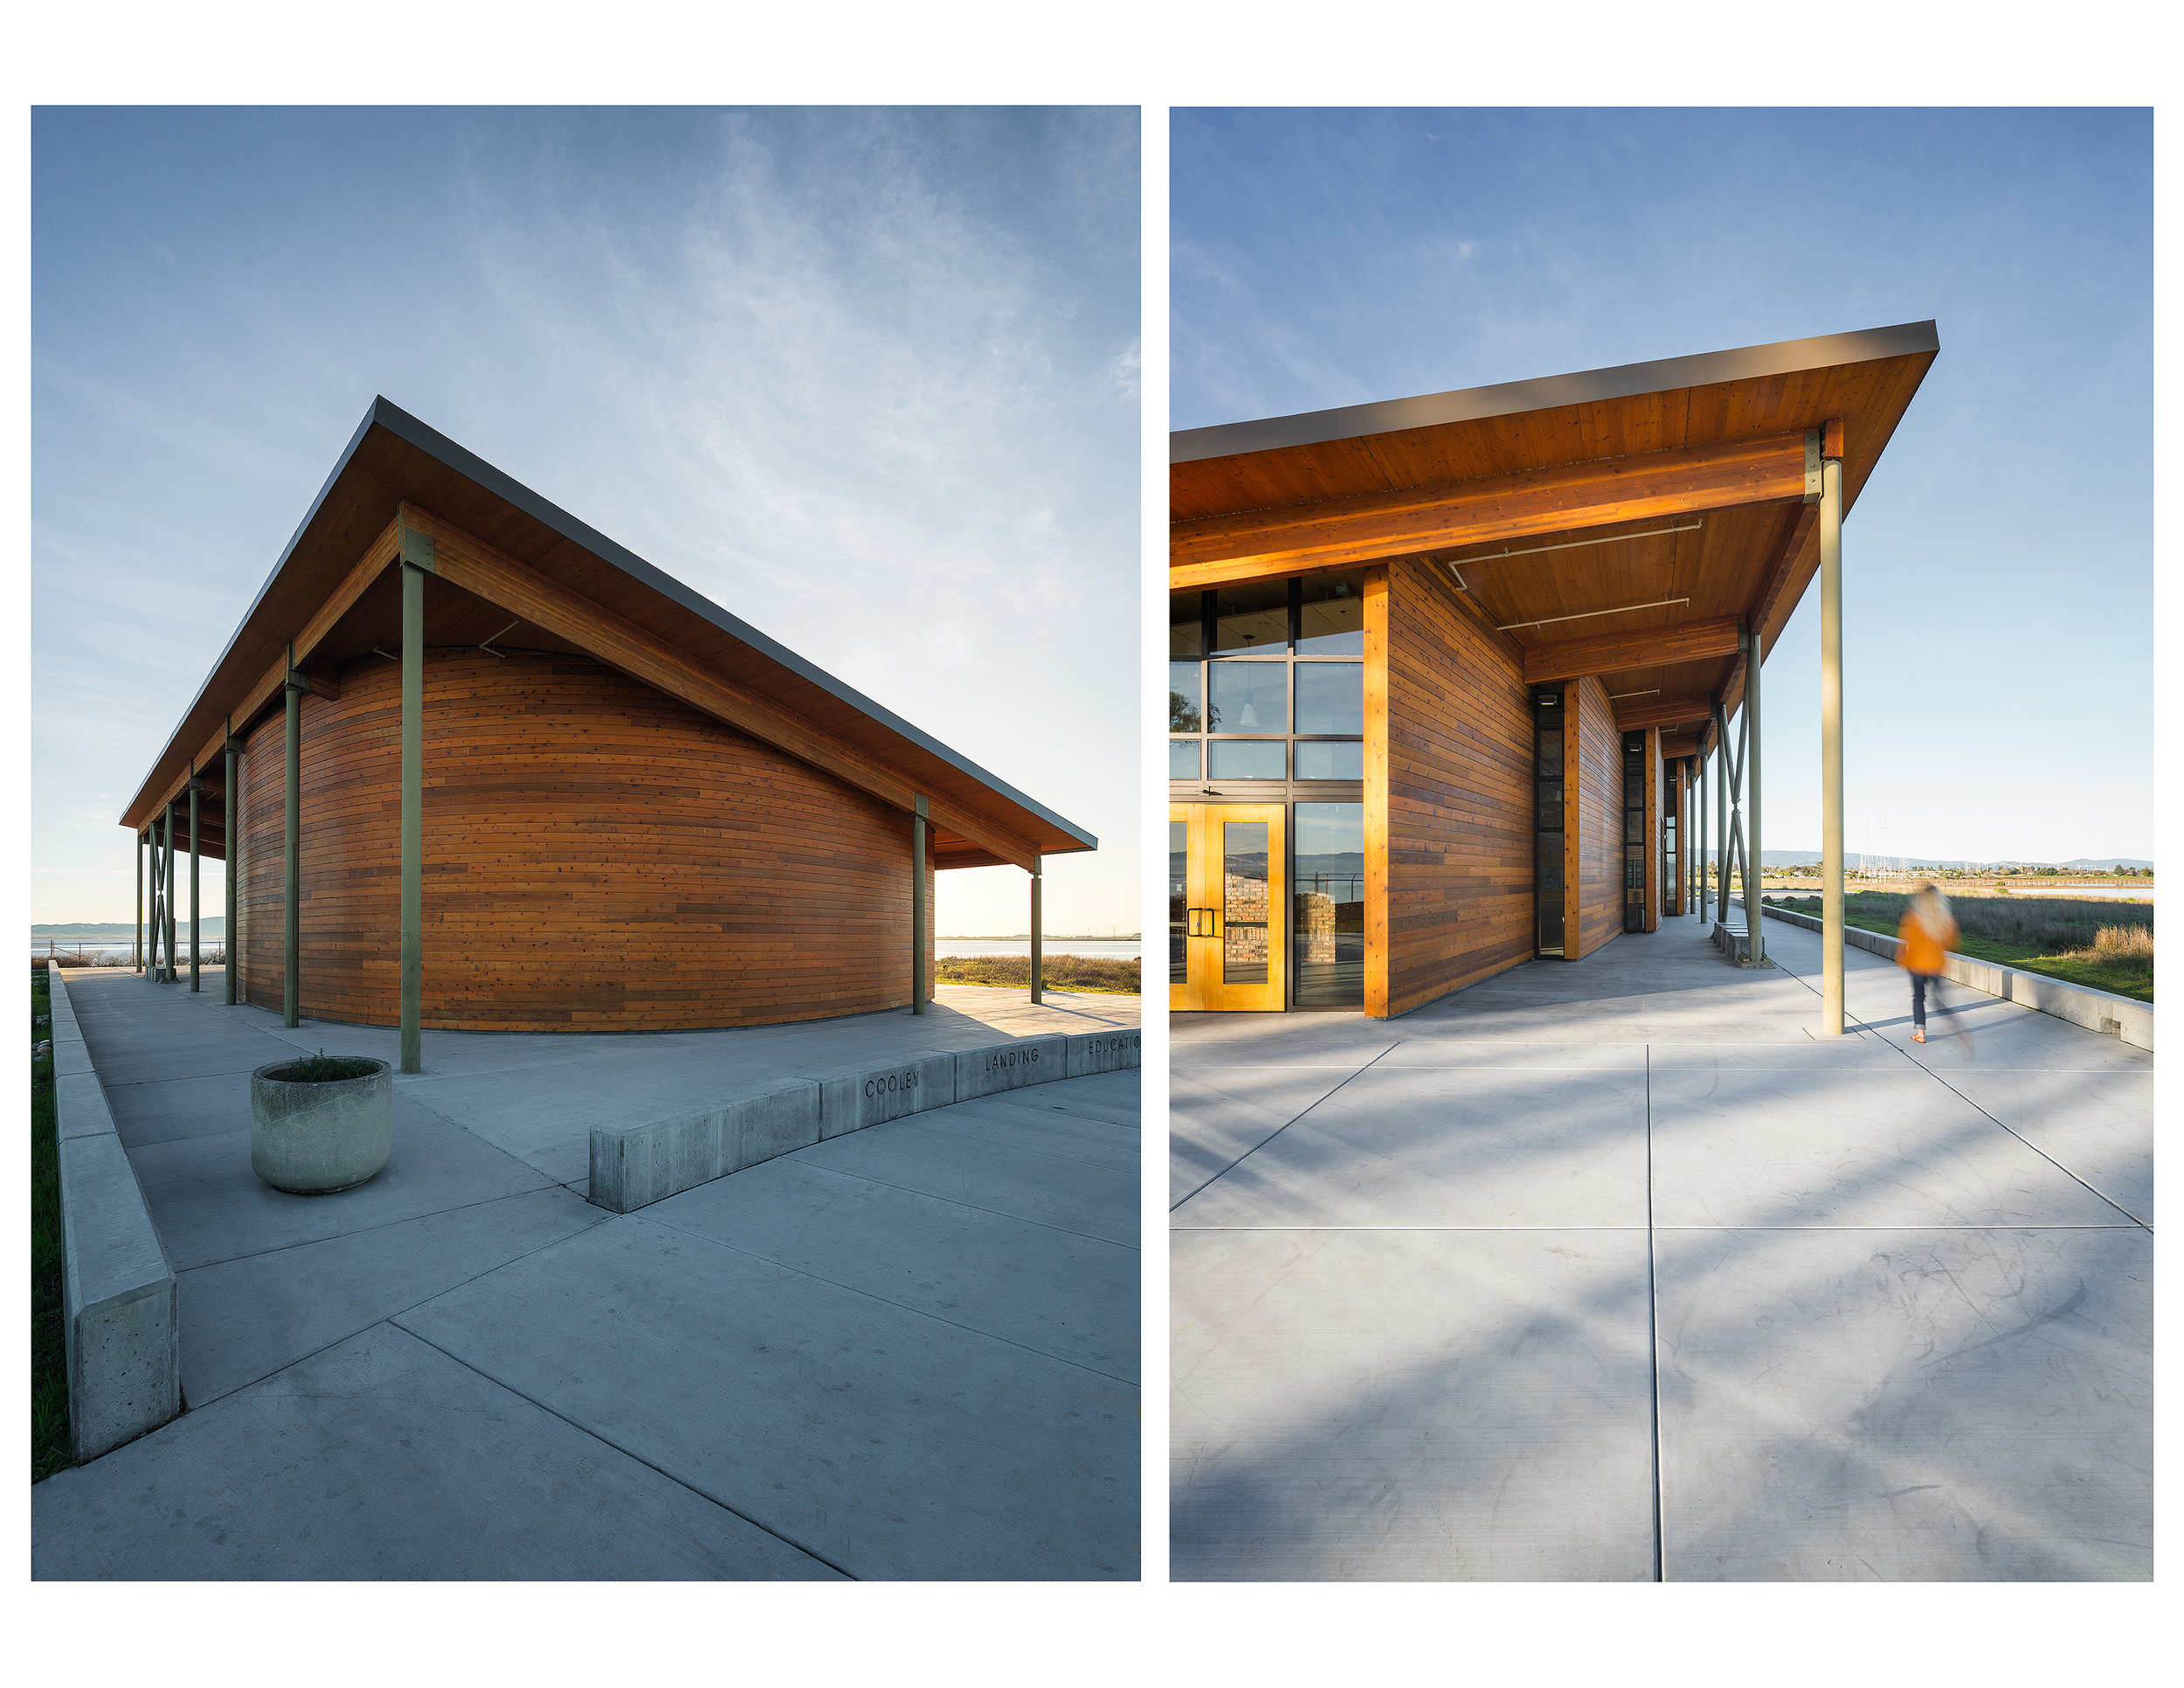
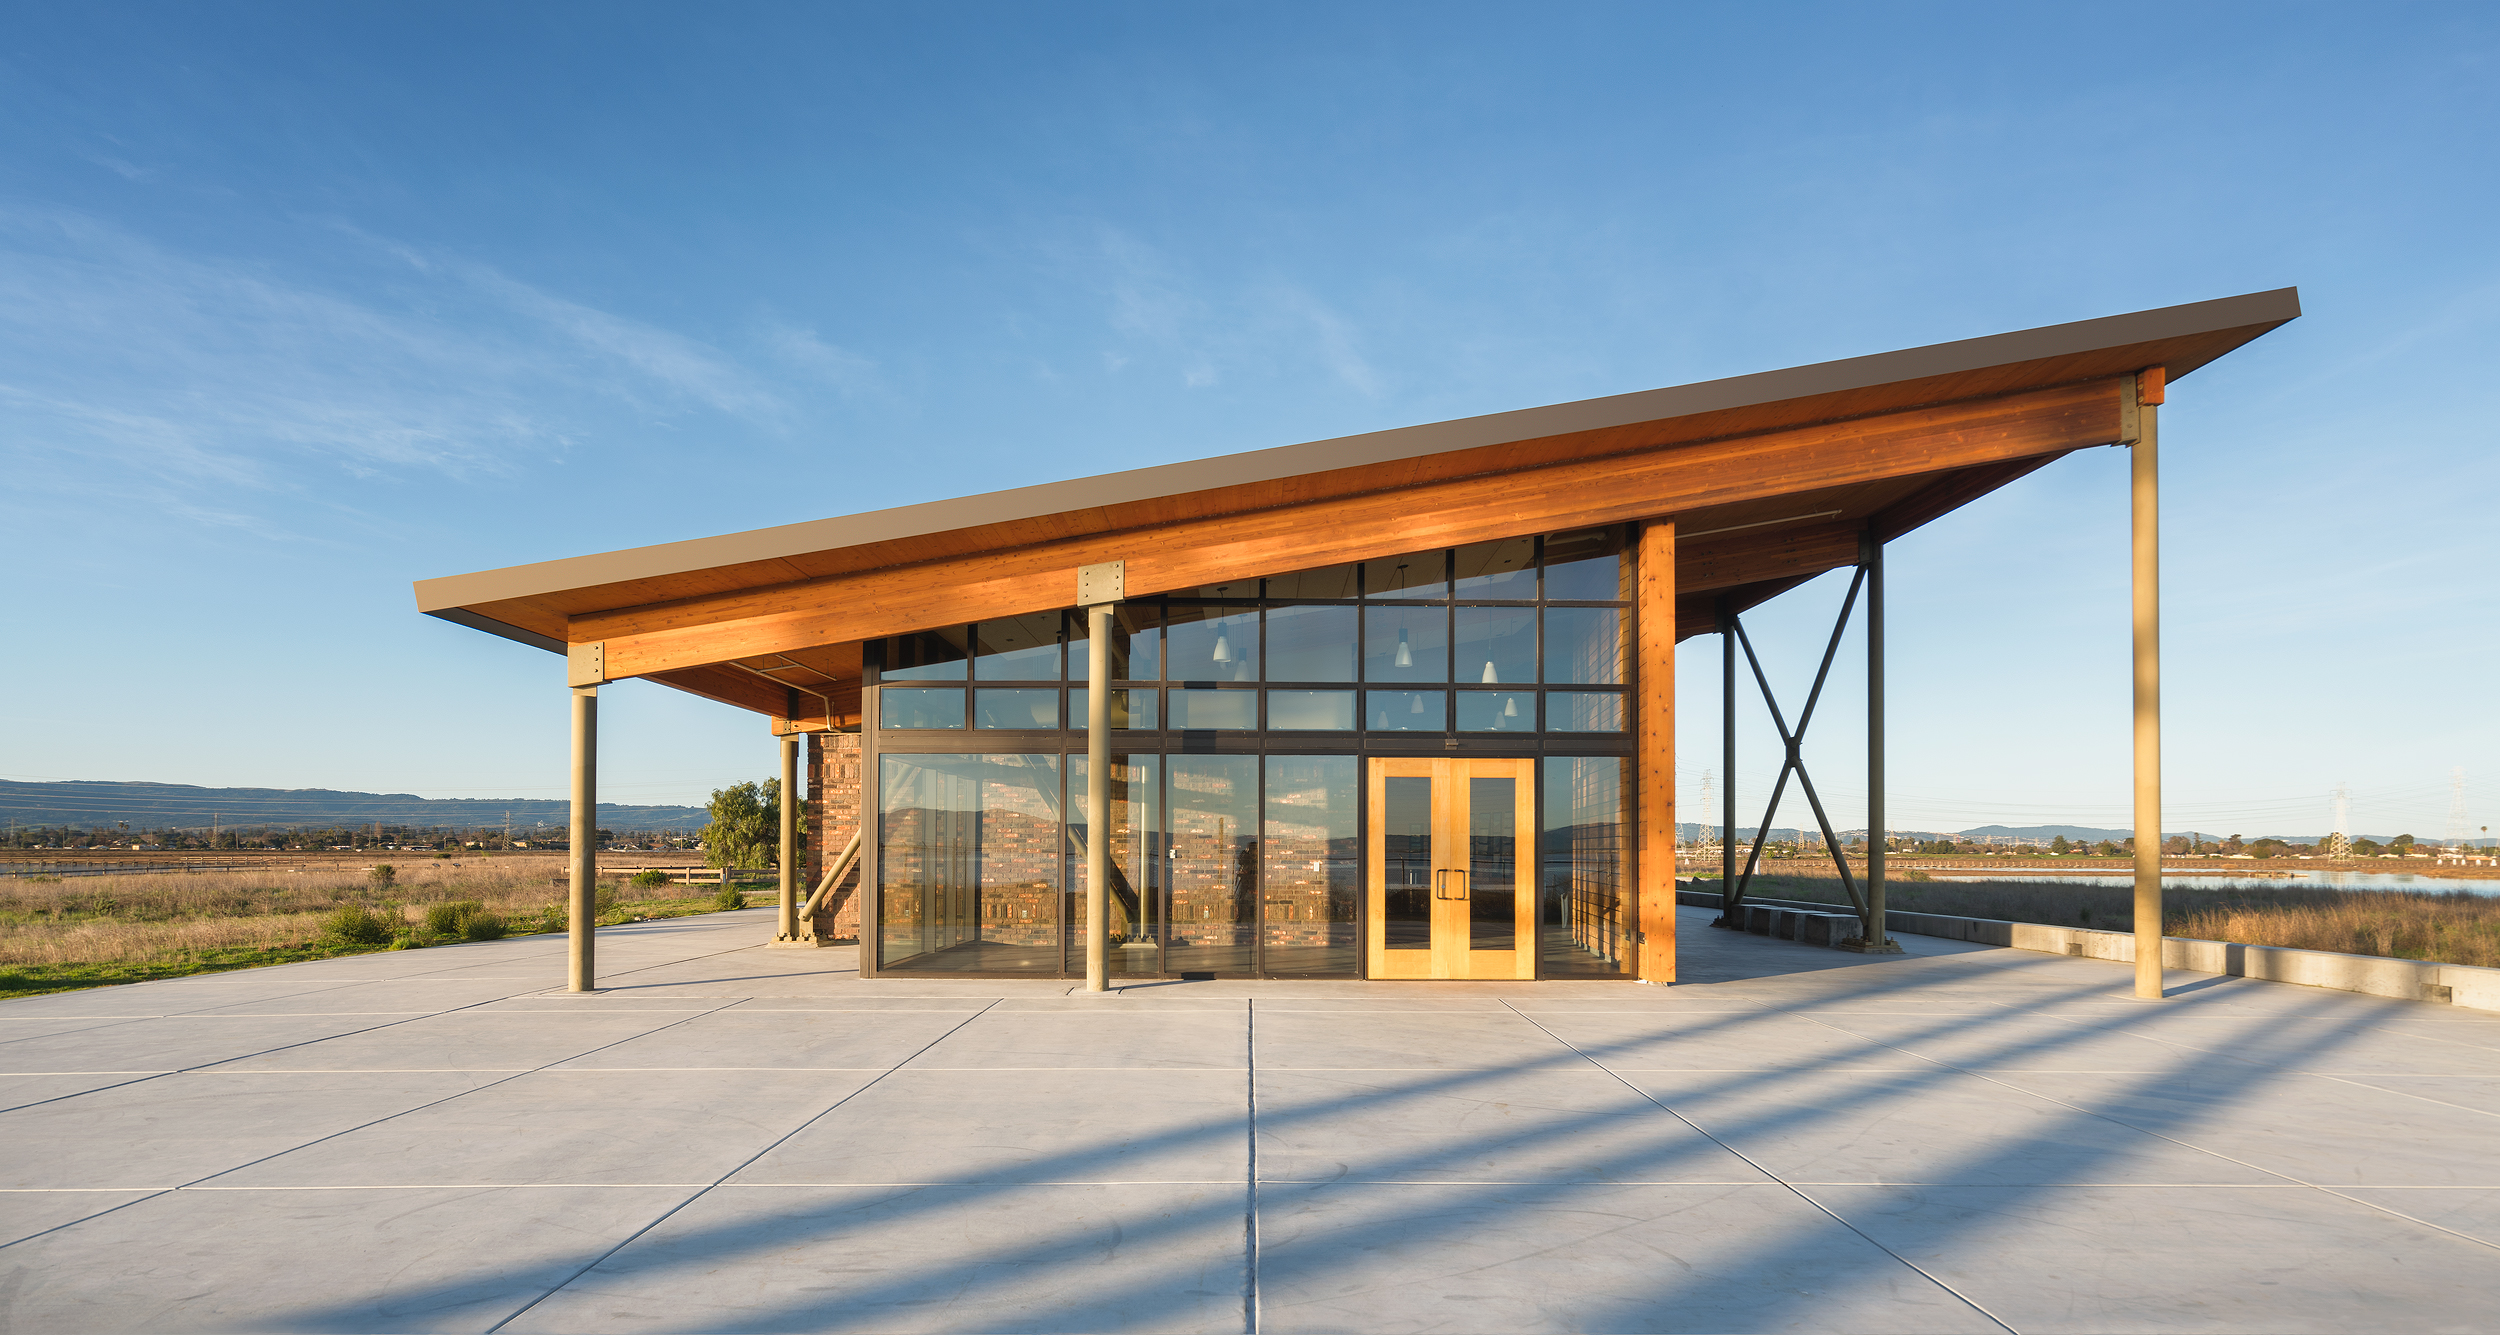
Szabo Ranch House drone footage

New construction by Tobin Dougherty Architects.

Over the Thanksgiving weekend, I had the opportunity to connect with Tobin Dougherty Architects and capture their latest project by drone. This is a beautiful home in the Sierra Foothills on 40 acres, overlooking the Szabo Vineyard. The inspiration behind the project, as I was told by the owner, was to marry Palm Springs modernism with Sierra Foothills living. Looking forward to seeing the completed project in 2018. 

Real Estate vs Architectural Photography

I was recently hired to shoot a new home construction in Mill Valley, CA. The builder told me they had some Real Estate photos done but they didn't quite capture the space like they had hoped.

This short post explains some of the differences between Real Estate photos and Architectural photos and my thinking behind my final images. I'm not calling out the Real Estate photographer or faulting his work. Since I have been in both situations I can relate to how quickly you need to shoot spaces and turn that work around. I am simply sharing my thoughts on why, as an Architectural photographer, my eye sees spaces differently and explain how I create more compelling images. 

Let's first start with this living room shot.

On top is the Real Estate photograph and below is my shot. Typically with Real Estate photos, the photographer is trying to emphasize how large the room is and thus shoots with an extremely wide lens. Objects become very distorted and not to scale with the rest of the room. The couch circled in red is a prime example. The edge of the couch is more than twice the size of the chair sitting across from it. Other examples of extreme wide angle distortion can be seen in the trusses, the table to the left, and the far room which is too small to make out what is back there. 

In contrast, I chose to shoot this with my 24mm tilt-shift lens. 24mm is still wide enough to capture the room but provides very little distortion. I moved the camera forward in the scene and positioned it as if you were sitting on the couch. The Architect (OXB STUDIO) obviously spent a lot of time thinking about how the spaces interact with each other and created a central courtyard which the living room, dining room, and guest bedroom all look out at. By opening the door next to the fireplace and the large slider in the family room, I allowed the eye to move through the scene without interruption.  

07_71 Cascade_Web.jpg

The wide angle lens strikes again. Above is the Real Estate shot for this beautiful guest bathroom. We can see that it is trying to show the vanity, toilet, shower, and size of the room. While this is a fine shot to help sell the home, here is why it doesn't work as an architectural image. 

The second photo shows my take on this bathroom and why it's crucial to learn how light interacts with each home. A lot of thought is put into the placement of windows and special features like skylights, and at certain times of the day they can produce a profound effect. For this shot, I continuously checked on the bathroom, waiting for the exact time to take advantage of the light streaming in and used only natural light to illuminate the space. I set the camera up in the doorway and "shifted" the lens to the right slightly to eliminate the door while still keeping the 1 point perspective. I purposely cut off the sink and toilet because your eye will naturally fill that space in with those objects. I pulled much of the color cast out in post as I wanted this image to feel modern and clean.

*Some background on this shoot. When I book a shoot I ask for a minimum of 4-6 hours on location and for larger homes 8-12 hours. Many might say well that seems like way more time than you need to get some shots. How hard can it be? While the RE photographer only has maybe an hour to get his shots in before he/or she needs to move on to the next home, I on the other hand have more time to think about light, composition, and space. This allows us to time shots which might have been missed otherwise. 

ISu0kkvf4cc7iy0000000000.jpg

My last example covers one of the guest bedrooms in the house. When we scouted, the builder mentioned that they spent a lot of time and effort on the built-ins throughout the bedrooms. I chose to do a one-point perspective here as I felt it was the most powerful. The rug, floor, bed, and light all direct your eye through the image- first stopping at the built-ins and  then moving on to the far room. We moved a dark, heavy couch from the family room and placed the Eames chair that was previously in the bedroom at the end of the frame, slightly off camera, to break up the white wall which helped to show scale and give an end point for the eye. 

I hope this brief breakdown has given you some insight into my thinking behind these shots and the differences between Real Estate Photography and Architectural Photography.  As I take on more and more projects I will continually update this blog with my thoughts. More photos can be seen below. 

Links listed below:

OXB STUDIO ARCHITECTS

SINGLE POINT DESIGN BUILD INC.

Rhino Motion in Iceland

At the start of 2015 I began my journey into timelapse photography. It had been on my mind since I picked up the camera a number of years ago. I made a few films throughout the year; a series titled “Discovery,” which were filmed throughout the West Coast. After putting these together, I really wanted to travel internationally- somewhere with unique landscapes that would be a challenging and exciting location for my first timelapse of 2016. With a great deal on airfare to Iceland, my wife and I saw our opportunity and the big trip I had been hoping for was scheduled. I knew Iceland was going to be exactly what I was looking for with it's vast landscapes and constantly changing weather. We pre booked AirBnB's around the island before we arrived, planning on a few days in each area. We also left a few nights open to sleep in our car in case we found something we wanted to spend more time at along the way.

With the trip coming up, I began planning out the gear I would be packing on my back throughout my two weeks in Iceland. I had been using eMotimo for my past timelapses, but Rhino had since come out with their Motion System. With its light weight design, slick interface, and simple “set up and shoot” mentality, I knew it was something I wanted to add to my kit. The guys at Rhino were able to get the Motion and their Rhino Slider Evo Carbon 24" over to me just in time for my flight, and I couldn't be more excited to try them out.

My first experience using the Motion was at a random stop along our drive around the Golden Circle. We were on our way to Bruarfoss and Gullfoss when we saw this beautiful glacier melt lake with snow covered shores and had to pull over. We ventured out and after a bit of exploring I found a unique spot in the lake that showed a glimpse into the frozen water below and reflections of the mountains behind. I got out the Motion and adjusted the rugged feet so that it was level on the snow. Since the entire system weights only 4lbs it was able to distribute the weight evenly across the snow. In just a few minutes I was up and running, shooting the rapidly changing weather. 

With my first timelapse shot in the bag, I was excited to keep going. Our next stop was Bruarfoss, and after a very bumpy ride through unpaved residential roads filled with pot holes, our trusty rental car got us to the parking area. I grabbed my bag and headed out for the short hike to the falls. We had the waterfall to ourselves so I scouted it out, trying different locations before settling on a forward moving shot through the beams of a walking bridge that framed Bruarfoss in a very dramatic way. I attached a tripod mount on one end of the slider and placed the other end on the opposite side of the bridge. Since Rhino Motion attaches directly to the slider carriage, the height of the rails is minimal. This means that it was at the perfect height to capture exactly what I had envisioned. It was mounted in a tricky spot but since the controls are not directly on the unit it meant I could stand a a few feet back and set up the shot.  

Making our way around the island, Hvitserkur was another location I was really looking forward to. It is on the northwestern part of the island and the beach has a huge basalt formation that some say looks like a dragon drinking out of the water. When we arrived at the beach, the sky was grey and it was sprinkling off and on. We had the whole day ahead of us and nothing else planned on our way to Akureyri so I took my time with stills, waiting out the small waves of people that came down to shoot the unique rock. Waiting paid off in the end- as I was setting up the rails to get a sliding timelapse near the stream, the sky began to clear up, and a full rainbow appeared. The last group of people left, and I hurried over to the spot I had planned to set up the Motion, this time with the added bonus of a rainbow in the background. 

Continuing our journey around the island I was able to shoot in various locations, from mossy lava fields to glacier chunks on black sand beach, to the Vestrahorn mountains at Stokksnes. While the Rhino Motion performed as I hoped it would, the fact that it was set up and ready to go in it’s 24" Carrying Case at all times was what really impressed me. The armor protected it on the plane and in the car with all of our luggage, yet was easy to access and pull out at a moments notice. This was key to capturing whatever caught my eye on my journey around Iceland. As the locals say, “If you don’t like the weather wait a few minutes,” but I found that if I did like the weather, I might only have few minutes before it took a turn for the worse. The quick set up and ease of use was something I really appreciated from it- it allowed me to capture the scenery and weather I was experiencing in that very moment, a moment that often didn't last long.

Overall Experience with Rhino Motion

Using the Rhino Motion throughout the trip was extremely positive. I never ran into a situation the slider setup couldn't handle. I was even able to use the rhino motion as an advanced intervalometer without the rails. This made calculating a timelapse a breeze as you input the length of clip and shutter speed. This came in handy for adjusting the exposure settings and seeing the progress of the shoot. Battery life was never an issue even after doing inclined motions; it lasted almost the entire trip on one charge. I look forward to further exploring the limits of what the Rhino Motion can shoot and pairing it with their new Rhino Arc in the future. 

Blog post and more Rhino products can be seen here: Rhino Camera Gear